
 Sanako Study1200


 Each student will then see the Personal data window appear in the top left of their screen and they can enter their full name and click OK.

The teacher will then see this given name under that student icon.
Students can click the Call icon to get help.
 The teacher then sees a “?” above that student’s icon. Clicking on the ? icon, the teacher can go into the Discuss mode for a 2-way conversation with that student.

When the teacher clicks the Chat icon the blank Chat window appears.
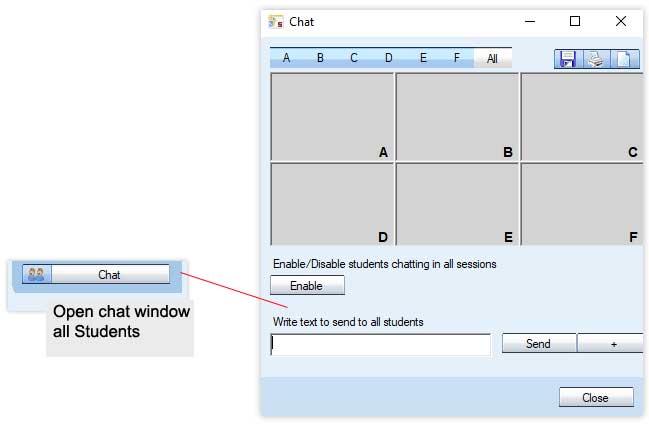
Once the teacher clicks the Enable icon the chat session becomes active and the window changes to show coloured backgrounds.
If you are conducting a whole class session then click on the A icon at the top left of the Chat window and the whole top section will turn blue.

Simply type your question into the text box at the bottom of the window and then click the Send icon.
Your text will be shown to all the students and they can enter their individual response. As each student responds your chat window will update to display their answer.

Click on File and then select the Create Attendance Report option.
 You will then be shown the Save As window as shown below, select where you want to save your text file to and give it a suitable name.
 When you open the saved report it will look something like shown below with the date and time automatically added along with a list of all the students logged in to your lesson.

Click PC control and then Shut down operations
 Click Log off. You can also Shut down or Restart!

1. Click PC control
2. Click Lock PC

The student icons turn into lock images
The students all have a BLACK screen now! Imagine that this is just like you placing a black piece of paper over the screen and hence everything they were working on is behind the paper and hence safe!
When you are ready you can “remove the black paper” or unlock the screens by repeating the 2 steps above that you did before – as shown below – click PC control and then Lock PC.


1. Left click on the student that you wish to monitor.
2. You see a small thumbnail image of their screen
3. Click on Remote Control or blue rectangle to see that students screen in detail
4. Click the X to stop monitoring that student

When monitoring the student will have no idea that you are doing so and you will also hear everything they are saying and listening to. The student’s mouse location is shown as a green arrow for you to follow.
Whilst monitoring a student screen you can take full or shared control of their mouse and keyboard if required by clicking either the Remote control or Collaborate icons.
Tips: If the student is working on a text document or presentation and you wish to work with them to correct mistakes/suggest improvements, select the Collaborate option. This means that you can take it in turns to enter text and discuss.
If the student is working on a web page or interactive type application, select the Remote control option. This means that you both don’t up trying to move the mouse at the same time!
1. Click Screen control
2. Click Thumbnails
The student icons turn into live images.

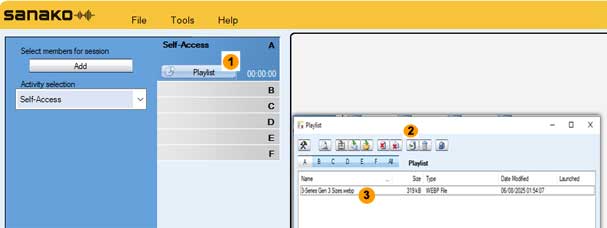 1. Click Playlist
2. Click Add and browse for the file you want your students to work on
3. The file will then be listed in the top section of the playlist and will also appear in the playlist area of the student player as shown below.

Tips: You can add as many files as you want to the list and of any type e.g. Audio, Video, Pictures, Documents, Presentations, Web links etc…
You can Copy and Paste to the Playlist area
You can Drag and Drop to the Playlist area
Make sure you delete files in the playlist at the end of the lesson to make sure you start the next lesson with a blank playlist
Make use of individual Tutor playlists


The activity selection will usually be displayed as Self-Access. Click the down arrow shown at 1 and select the Round table discussion option.
Change the Media source selection to Tutor.
Click the All students in session option 2.
Click the Start icon shown at 3 to begin recording the students. The real-time counter at 4 will move accordingly.
Click Yes when you see the following message.

Your students will now all hear you and you can then allow individual students to speak to the class at the same time as you by clicking the Select icon at 5 and then clicking on the student. The selected student icon will then have a MIC added to their display.
Click Done and that student will be heard by the class. Repeat the Select and Done commands to allow different student to contribute in turn.
When you have finished click the End icon shown at 6 and Clear session.
![]()
If you want to record the class discussion then select the Record discussions option in the Activity options menu.
 You may also want to allow the students and yourself to interact using a textual chat window whilst talking.
If you enable textual chat then the students will see the following window appear on their player.
 Students can “request” the microphone by clicking the microphone icon on their end. If they are given the microphone by the teacher, the On Air icon will illuminate and the Chairman: field will display Me as shown above.

If you want to listen to any of the pairs or groups once the activity is started then simply click on any of the students in that pair or group.
If you click the Discuss icon whilst listening then all the pair/group members will hear you.
The members of the group are shown whilst monitoring.
 Students can find out who they have been paired or grouped with by simply clicking the word Discussion in the bottom left part of their player.
 Activity Options:

+ Record discussions: to collect all the student pair/group discussions.
+ Free mode student recording: to only collect audio when the students have pressed their SPEAK icon.
Tip: The Free mode student recording option is very useful if you only want to collect the audio when the students actually start the exercise – it may be that the first minute or two is spent setting up the exercise and deciding on who is who in the role play?

The activity selection will usually be displayed as Self-Access. Click the down arrow shown at 1 and select the Model imitation option.
Live the Media source selection to Tutor.
Click the Start icon shown at 2 to begin recording the students. The real-time counter at 3 will move accordingly.
You will notice that the student icon change to display a record icon shown as a red circle
![]()
When you have finished click the End icon shown at 4 and collect the audio as shown on
Your students will have been left with a copy of the file to listen back to at their one pace which will remain until your select Clear session icon at 5 and all audio will be removed from your students and yourself.
Once you press the End icon the following screen appears.

Click the Collect icon and every student recording will be collected as an individual file to the location specified as an MP3 file.
The files will be named according to name given under each student icon on the teacher screen e.g. predhead.mp3, jsmith.mp3.
Tips: The recordings will only contain the student responses and will not include the teacher voice. However, if you want to collect your voice as well then you can select the Advanced icon in the window shown above and tick the option to collect the Program track.
You may also want to use a different audio source from that of your voice. To do this simply, click the Media source selection drop-down menu and you could for example select an existing MP3 file or use an audio CD.


Simply click on the grey Talk icon on the tutor screen.
 The “Talking to students” and loudspeaker icon on the Tutor interface becomes active. The black moving bar indicates when you are speaking – sometimes known as All Call.
1. Click the left button on your mouse whilst the pointer is over a student.
2. Click the Discuss icon – it will change to a darker colour when active
3. When you have finished listening then click the “X” at the top of the window.

Why do this? Ideal for marking purposes – collect in student work to take away on say a USB pen stick. Gather evidence of student attainment for on-going personal development plans and future lesson planning. Ensure that you have a copy of your students work for the time when they say “I have lost it!”
Click the Homework icon and the collect files screen will appear.
![]()
Ensure that your students have all saved a copy of their work before you collect it in.
1 – Decide where you want to save the student work – it can be anywhere such as a USB pen-stick or your My Documents area. By default, the student work will be collected to a pre-defined shared area on your network (usually a directory of your shared network languages folder) and a directory will be created based on the date and time.
2 – Click the Allow returning icon and your students will be shown a homework return screen.
 All they need to do is to browse for their saved work and then send – shown as 1 and 2 below.
 As your students send their work you will see them appear in the tutor collection folder below. Each file sent clearly shows who sent it in the brackets part of the filename.


The Activity selection will usually be displayed as Self-Access. Click the down arrow at 1 and select the Web browsing option.
Change the Web policy selection at 2 to Allow Policy.
Now enter the web pages that you want your students to be allowed to browse to. For example, if you enter www.bbc.co.uk/languages then your students will be allowed to browse to all sub-pages such as www.bbc.co.uk/languages/french – so long as the page starts with the page address you enter.
When ready, simple click the Start icon shown at 3 to launch Internet Explorer to all your students. It will launch with the pages you added shown as hyperlinks.

If the student tries to browse to any page that is not allowed then they will be taken back to the above page.
1. Click the PC control icon
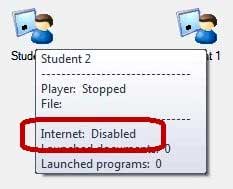
2. Select the Disable internet option from the drop-down menu.

Your students will no longer be able to browse the Internet.
Hold your mouse over any student icon to verify that internet access has been disabled.
 To give your students Internet access back simply repeat steps 1 and 2 above. If you close the Tutor application or log off, shut down, restart then Internet access is restored.
The Content exercise activity is used together with either ready-made or custom content provided by Sanako.
The activity allows you to launch content files directly to students. This will open an exercise window on the student players where they will be able to access the learning material, complete any exercises within and use the player to listen and record.
To launch a content file to students, select the Content Exercise activity and click Select and then browse for the file.
 The file is opened in an exercise window next to the student players, but they are not yet able to use any functions in the file.
 After the file has been selected, click Start. Students are now able to access audio functions and can complete any exercises within the material.
After selecting an activity in the Activity selection menu, Listening Comprehension in our example, select the Text-to-Speech (TTS) option from the Media source selection menu.
 This will result in the Text-to-Speech window appearing below.

(1) Open a saved .TXT file or copy and paste text to the main window, for example from a Web page
(2) Click to show the advanced settings
(3) Select the appropriate Sanako Voice from the drop-down list. Only the voices that you have purchased and installed will be shown.
(4) Click Play to hear the audio
(5) Click Next when you are happy to continue. Save the MFF audio file to where you want and wait a bit for the audio has been encoded. After a short period you will then be able to start begin playing the TTS audio to your students.
Tips: You can also create a Text-to-Speech audio from a text file by opening it normally from the File menu in the Tutor Player (not the Tutor software!). The only difference is that the file is not launched to the students so you will need to add it to the playlist before or during the lesson.
1. Select the Vocabulary test option from the Activity selection drop-down menu.
 2. Click New to create a new test or click Open… to open a ready-made test. You will then see the Vocabulary test creator window below.

3. Give your test a name
4. Is the test timed or not? Do you want to use all words?
5. Enter/Modify your list of words and their translation(s)
6. Add instructions, tips or hints?
7. Save your test if it’s a newly created one or Start it right away if you’re launching a ready-made test.
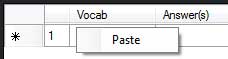
Tips: If you want to allow multiple answers then separate each answer with a comma – see below for an example.
![]() You can copy and paste existing vocab lists from Excel – simply select the columns from Excel and Copy. If you then right click on the top left box of the vocabulary test creator you can select the paste option as shown here.
You can copy and paste existing vocab lists from Excel – simply select the columns from Excel and Copy. If you then right click on the top left box of the vocabulary test creator you can select the paste option as shown here.

 Sanako Study 1200 Student interface with the Media Player and Chat windows
 Menus
Menus
The three menus of Study 1200 Student give you access to file functions, settings and preferences, and to online help.
![]() The current activity set by the Tutor
The current activity set by the Tutor
![]() Your current session and position number
Your current session and position number
![]() You have been set as a model student. Your screen is shared to the other students and you can talk to them.
You have been set as a model student. Your screen is shared to the other students and you can talk to them.
![]() The lock symbol indicates whether your player controls are locked or free
The lock symbol indicates whether your player controls are locked or free
Media player
![]() Speak – Records the student’s voice onto the student track
Speak – Records the student’s voice onto the student track
![]() Stop – Stops the file.
Stop – Stops the file.
![]() Voice Insert – Activates the Voice Insert mode
Voice Insert – Activates the Voice Insert mode
![]() Play – Plays the open file.
Play – Plays the open file.
![]() Recap – Jumps back to the previous empty space in the program material.
Recap – Jumps back to the previous empty space in the program material.
![]() Pause – Pauses the file. When a file is being played, the Play button turns into Pause.
Pause – Pauses the file. When a file is being played, the Play button turns into Pause.
![]() Repeat – Repeats the selected segment or entire file.
Repeat – Repeats the selected segment or entire file.
 New – Clear the Player. This will close the currently open file and remove all bookmarks.
 Open – Open a media file for the Player. This opens a dialog in which you can browse for a file.

Save – Save the currently open file with the student track. By default the Study 1200 Player saves files in .mff format. The .mff files include the original program track, the student recordings and the set bookmarks
 Mode – Add subtitles or instructions to media files, play audio CDs, record audio from different sources, or view
audio graphs of the program and student track. For more information about the player modes, see the section Player Mode below.
![]() My files – Display the files in your own personal file area. All students have personal file areas where they can store files for themselves.
My files – Display the files in your own personal file area. All students have personal file areas where they can store files for themselves.
Playlist – Display the files in your session’s playlist. Each session has its own playlist assigned by the teacher.
Homework – Display the files that the teacher has assigned for your individual work. You can save these files and work on them at school or at home
AudioGraph

The AudioGraph view displays visual representations of both the program and student tracks. This allows students to view and compare the pattern of their recorded output with the program source.
To activate the AudioGraph view click Mode and select AudioGraph.
 License registration must be on client or user


 3. Activation Window
 4. Enter Token and then enter your token
(11111-22222-33333-44444-55555)
 5. Open the SANAKO registration side and login your account.
information Activate License Token, Product and Activation Date.


![]()
![]()
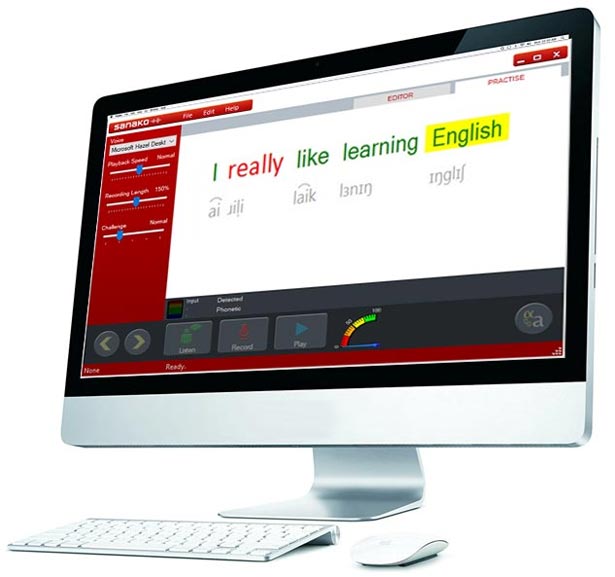 Sanako Pronounce
![]()
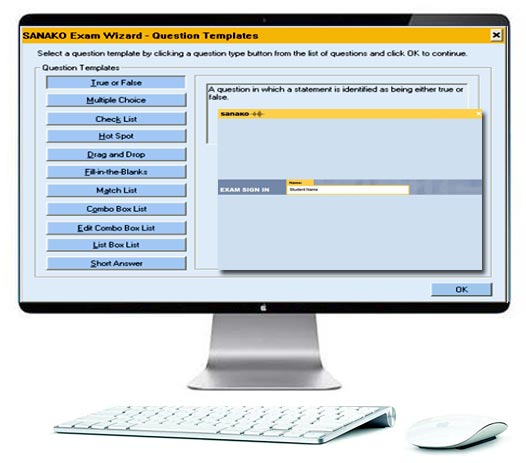 Sanako Exam Module

Corporate Office : House # 78/6, New Airport road (2nd floor), Mohakhali, Dhaka-1212, Bangladesh
Telephone No : +880 22222-99242
Contact No : +880 1995 584 322, +880 1717 157 398, +880 1911 385 563
E-mail : info@moebd.net modern_moe@yahoo.com
Web : www.moebd.net
 +880 1995 584 322, +880 1717 157 398, +880 1911 385 563
